Control Ned/Ned2 with Matlab
V.2.1

Difficulty: medium
Time: ~30 min
Note
- This tutorial is working from:
- The version v4.1.0 of the ned_ros_stack
Objectives
Being able to control and create content with Ned/Ned2 and Matlab
Requirements
Basic knowledge of Matlab
Basic knowledge in robotics and kinematics
Having looked at the tutorial: Setup Matlab and the ROS Toolbox for Ned/Ned2
Note
You have to be in this situation to start this tutorial.

Rosinit setup
Otherwise, do this tutorial first.
What you will need
A Ned or a Ned2
Matlab (2014 version or more)
Robotics System Toolbox : https://fr.mathworks.com/products/robotics.html
A Wi-Fi communication
Note
To do this tutorial we used Windows10, Matlab2022a and a Ned2.
Connection between Ned/Ned2 and the computer
Get the direct geometry model
Note
The direct geometric model of a robot provides the location of the end-effector in terms of joint coordinates.
In this section you will be able to have a first application of Ned/Ned2 using Matlab. You will learn how to import the rigid body of Ned/Ned2 on Matlab and work on its direct geometric model.
Get the initial configuration of Ned/Ned2 and prepare the matrix
ned=importrobot(ned.urdf);
eeoffset = 0
eeBody = robotics.RigidBody("end_effector")
setFixedTransform(eeBody.Joint, trvec2tform([eeoffset,0,0]))
addBody(niryo_one, eeBody, "tool_link");
ik = inverseKinematics("RigidBodyTree", ned);
weight = [0.1 0.1 0 1 1 1];
initialguess = ned.homeConfiguration;
pose_M = [0.25 0 0.3];
tform = trvec2tform(pose_M);
configSoln = ik("end_effector", tform, weight, initialguess);
cell = struct2cell(configSoln);
Joint = cell(2,:,:);
matrixJoints = cell2mat(Joint);
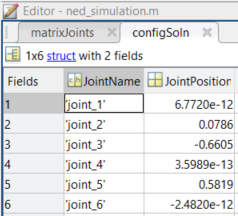
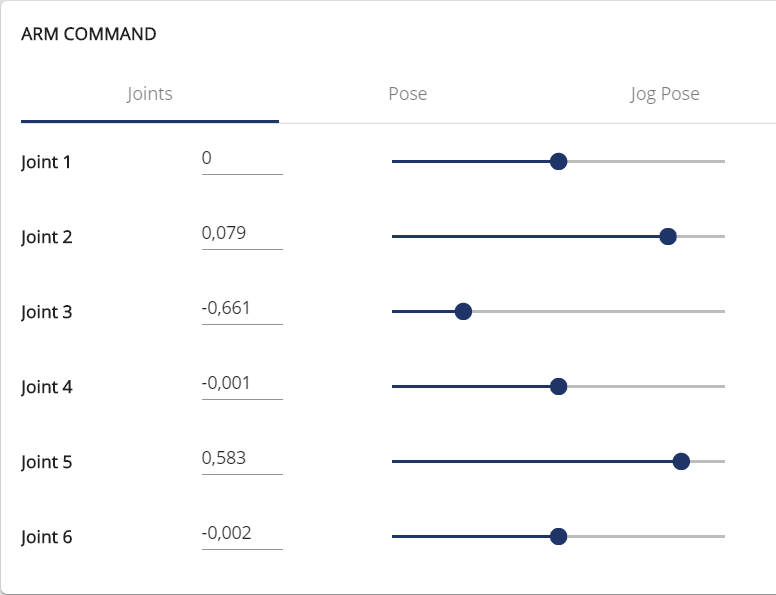
You should have these values in Matlab:

Joints values in Matlab

Joints values in Niryo Studio
Prepare and send a ROS message
Important
If you are using a Ned, before sending the message to the robot, make sure to disable the learning mode in Niryo Studio (you should hear the motors).
Now, you will setup a ROS message, with your matrix previously prepared.
To do that you just have to type this:
%These lines remain commented if you have already initialized ROS, otherwise, make sure you have done the matlab setup tutorial and uncomment the lines.

%ipaddress = "http://IP_OF_NED:11311"; %IP of the Ned
%rosshutdown; %to be sure that an other ROS network is not actually working
%setenv('ROS_MASTER_URI',ipaddress) %IP of the Ned
%setenv('ROS_IP','IP_HOST_COMPUTER') %IP of the computer
%rosinit(ipaddress)

NedState = rossubscriber("/niryo_robot_follow_joint_trajectory_controller/state");
NedCmd = rospublisher("/niryo_robot_follow_joint_trajectory_controller/command");
CmdMsg = rosmessage(NedCmd);
CmdPoint = rosmessage('trajectory_msgs/JointTrajectoryPoint');

for i=1:6
    CmdPoint.Positions(i) = matrixJoints(i);
end

CmdPoint.Velocities = zeros(1,6);
CmdPoint.Accelerations = zeros(1,6);
CmdPoint.TimeFromStart = ros.msg.Duration(3);
CmdMsg.Header.Stamp = rostime("now") + rosduration(0.05);
CmdMsg.JointNames = {'joint_1', 'joint_2', 'joint_3', 'joint_4', 'joint_5', 'joint_6'};
CmdMsg.Points = CmdPoint;

send(NedCmd,CmdMsg);
Note
It is possible that the robot does not move instantly, wait about 15 seconds maximum.
Hint
If you are using a Ned2 and the robot don’t move after sending the message, use Niryo Studio to do a movement (by changing the values of joints for exemple) and the relaunch the script.
Go further
NedState = rossubscriber("/niryo_robot_follow_joint_trajectory_controller/state");
NedCmd = rospublisher("/niryo_robot_follow_joint_trajectory_controller/command");
CmdMsg = rosmessage(NedCmd);
CmdPoint = rosmessage('trajectory_msgs/JointTrajectoryPoint');

y=0.10;

while 1
    y=y*(-1);
    pose_M = [0.25 y 0.3];
    tform = trvec2tform(pose_M);
    configSoln = ik("end_effector", tform, weight, initialguess);
    cell = struct2cell(configSoln);
    Joint = cell(2,:,:);
    matrixJoints = cell2mat(Joint);

    for i=1:6
        CmdPoint.Positions(i) = matrixJoints(i);
    end

    CmdPoint.Velocities = zeros(1,6);
    CmdPoint.Accelerations = zeros(1,6);
    CmdPoint.TimeFromStart = ros.msg.Duration(3);
    CmdMsg.Header.Stamp = rostime("now") + rosduration(0.05);
    CmdMsg.JointNames = {'joint_1', 'joint_2', 'joint_3', 'joint_4', 'joint_5', 'joint_6'};
    CmdMsg.Points = CmdPoint;

    send(NedCmd,CmdMsg);
    pause(3);
end
Note
You can find all the information concerning the use of Ned/Ned2 with Matlab and the ROS Toolbox by following the two tutorials below: